フラクタル図形の描画(C)
基本情報技術者試験の勉強...!
ITを学ぶ第一歩として 基本情報技術者 (FE試験)の資格取得に向けて勉強しています.(令和2年度春は中止になってしまいました...)
フラクタル図形を描画するプログラム
午後のC対策に下の本勉強している中で平成28年度春の問題でフラクタル図形を描く問題があったので,
写経しつつ,実際にプログラムを動かしてみました.
図形の一部を拡大すると,再び同じパターンの図形が現れる自己相似性を持つ図形をフラクタル図形と呼ぶ.改訂3版 基本情報技術者試験 C言語の切り札 (情報処理技術者試験)
- 作者:宮坂 俊成
- 発売日: 2017/02/09
- メディア: 単行本(ソフトカバー)
プログラム内で単位図形となる部分を与えています.
フラクタルを生成する深さd(回数)は入力値を使い,深さ毎の .datファイル を出力,
Gnuplotで0は黒,1は白として .gifファイル を作成します(for文使って出力します).
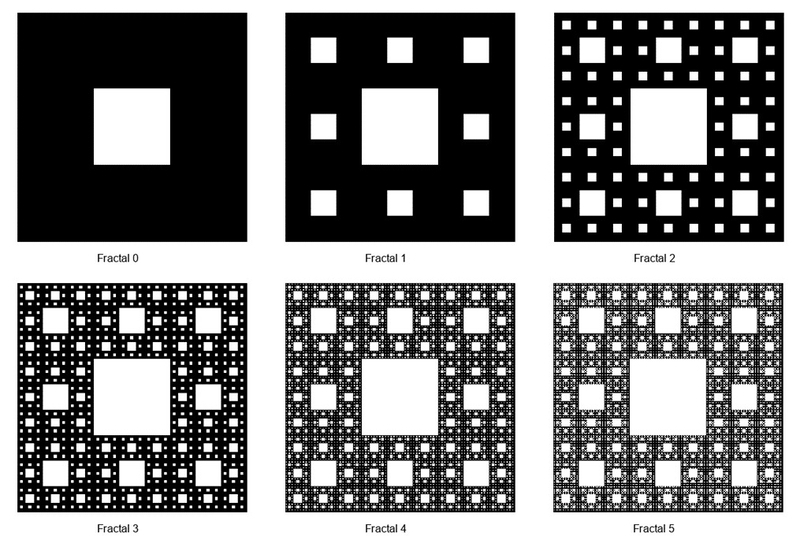
出力例(d=7)
Fractal0は単位図形になります.なんか反転してます.
 例1:単位図形 = { { 1, 1 },
{ 1, 0 }, };
例2:単位図形 = { { 1, 1, 1 },
{ 1, 0, 1 },
{ 1, 1, 1 }, };

例3:単位図形 = { { 1, 1, 1 },
{ 0, 1, 0 },
{ 1, 1, 1 }, };

例4:単位図形 = { { 1, 1, 1 },
{ 0, 1, 0 },
{ 0, 1, 0 }, };
ソースコード
C
#include <stdio.h>
#include <stdlib.h>

/* 単位図形,例1の場合 */
int pat[2][2] = {
    { 1, 1 },
    { 1, 0 },
};

/*2D配列のサイズ / 2D配列の行[0]のサイズ(列数) = 与えた行列の行数 */
int p_rn = sizeof pat / sizeof pat[0];
/* 2D配列の行[0]のサイズ / 2D配列の要素[0][0]のサイズ = 与えた行列の列数 */
int p_cn = sizeof pat[0] / sizeof pat[0][0];


/* プロトタイプ宣言*/
int exists_at(int, int, int);

int main(void) {
int i, j, k, rn, cn, d;
char filename[256];
FILE *fp;

/* フラクタル作成ループ*/
printf("Fractalの生成回数(d)を入力.\n");
scanf("%d", &d);
rn = cn = 1;
    for (k = 0; k < d; k++) {
        sprintf(filename, "frac%d.dat", k);
        fp = fopen(filename, "w");
            if (fp == NULL) {
                printf("ファイルをオープンできません.\n");
                exit(1);
            }
        rn *= p_rn;
        cn *= p_cn;
        for (i = 0; i < rn; i++) {
            for (j = 0; j < cn; j++) {
                fprintf(fp, exists_at(i, j, d) ? "0 " : "1 ");
                    /* cmd画面確認用:putchar(exists_at(i, j, d) ? '*': ' '); */
            }
            fprintf(fp, "\n");
        }
        fprintf(fp, "\n");
    }
fclose(fp);
return 0;
}

int exists_at(int i, int j, int d) {
    if (d == 0) {
        return 1;
    } else if (exists_at(i / p_rn, j / p_cn, d - 1) == 0) {
        return 0;
    } else {
        return pat[i % p_rn][j % p_cn];
    }
}
gunplot
cd '「.datが入っているディレクトリのパス」'
d = 7
set term gif size 400, 400

set size square
set nozeroaxis
unset colorbox
set palette grey                     #gray0 = 黒
set title font "Arial,20"
set key center below

do for [i=0:d-1] {
   set output sprintf("frac%d.gif", i)
   set notics
   data = sprintf("frac%d.dat", i)
   plot data matrix with image title sprintf("Fractal %d", i)
}

set output
本当は...
- 単位図形の部分を画面から入力(単位図形のサイズを自由に).
.datファイルに各深さdの結果を改行しながら出力,gnuplotで深さd毎の.gifファイル をそれぞれ出力.- コンパイルから描画までを走らせるバッチファイルを作成して,深さdはコマンドプロンプト上でCのプログラムからgnuplotに渡す.
の3点も実装したかったんですけど,
ので,今回できませんでした... またわかったら更新します...
おわりに
2月くらいからこの辺の本をメインに勉強していますがー,

令和02年【春期】 基本情報技術者 パーフェクトラーニング過去問題集
- 作者:山本 三雄
- 発売日: 2019/12/26
- メディア: 単行本(ソフトカバー)

- 作者:角谷 一成,イエローテールコンピュータ
- 発売日: 2019/11/25
- メディア: 単行本(ソフトカバー)
今回の試験が別日でやるのか,中止なのかまだわからないので一回勉強は休憩しようかなというところです...
Excel便利マクロ(VBA)
学生のときに使っていた個人的に便利なマクロを紹介します.
一度作ってしまえばショートカットボタンにして使えるので便利です.
Active Sheet内の図のx, y軸一括変更
シート内に作成した同じ型の図(グラフ)の軸を変更する場合にダイアログボックスの入力から一括して行うマクロ ModifyScale.
複数図があるとき,選択した図だけ変更でき,何も選択していない場合は全グラフを対象とします.
ダイアログボックスはx軸(横軸)の最小→最大,y軸(縦軸)の最小→最大の順で4回出てきます.
使用例
理科年表の水の粘性係数μ,動粘性係数νと温度の関係でサンプルファイル作りました(理科年表プレミアム - コンテンツ表示).
こんな感じで同じ型の図があるときに,
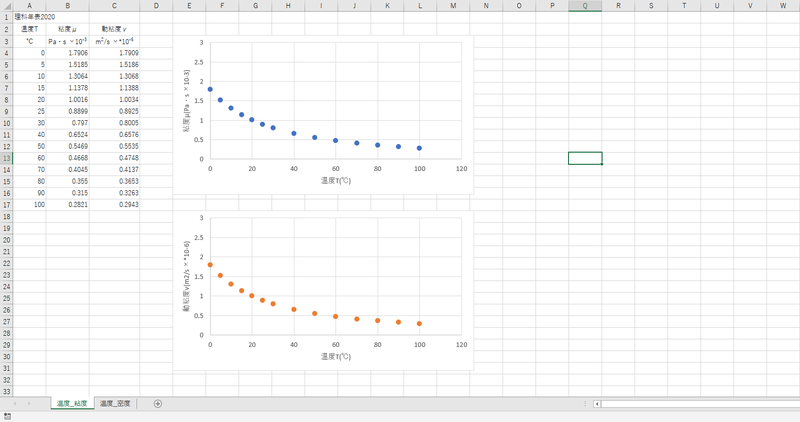
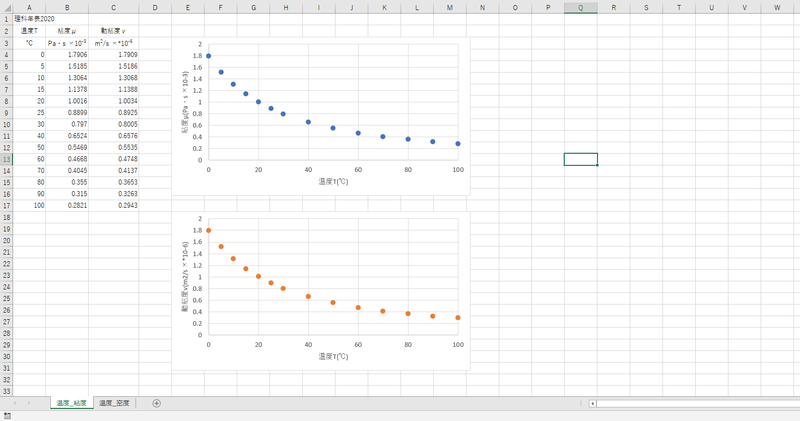
ショートカットにした ModifyScaleを使って,x,y軸の最小値,最大値をダイアログボックスから順に入力します(例ではx_min=0,x_max=100,y_min=0,y_max=2を入力).

で,一括変更できます(xは0~120を0~100に,yは0~3を0~2に).
ショートカットは棒グラフみたいなマークに設定しました.

ソースコード
ModifyScale
Sub ModifyScale()


    '** アクティブなシート内の選択したグラフのグラフ軸をダイアログボックスから入力して一括で変更するプロシージャ
    '** (選択されていない場合はすべてのグラフを対象)


    Application.ScreenUpdating = False      '画面の更新を抑制(高速化)
    On Error Resume Next                    'エラーを無視


    Dim x_max, x_min, y_max, y_min As String
    Dim chtobj As ChartObject
    Dim obj, obj2 As Object


    Rem x軸の最小値の入力
        Call DataInput(x_min, "x軸の【最小値】を入力して下さい。", "")
        If x_min = "" Then Exit Sub
    Rem x軸の最大値の入力
        Call DataInput(x_max, "x軸の【最大値】を入力して下さい。", "")
        If x_max = "" Then Exit Sub
    Rem y軸の最小値の入力
        Call DataInput(y_min, "y軸の【最小値】を入力して下さい。", "")
        If y_min = "" Then Exit Sub
    Rem y軸の最大値の入力
        Call DataInput(y_max, "y軸の【最大値】を入力して下さい。", "")
        If y_max = "" Then Exit Sub


    Set obj = Selection

    If TypeName(obj) <> "DrawingObjects" Then       '2コ以上のグラフが選択されると"DrawingObjects"を返す -> 選択されたグラフが1コor0コ

        If Not ActiveChart Is Nothing Then          '1コの場合
            With ActiveChart
            .Axes(xlCategory).MinimumScale = CDbl(x_min)
            .Axes(xlCategory).MaximumScale = CDbl(x_max)
            .Axes(xlValue).MinimumScale = CDbl(y_min)
            .Axes(xlValue).MaximumScale = CDbl(y_max)
            End With
        Else                                        '0コの場合 -> アクティブシート内全部
            For Each chtobj In ActiveSheet.ChartObjects
                With chtobj.Chart
                    .Axes(xlCategory).MinimumScale = CDbl(x_min)
                    .Axes(xlCategory).MaximumScale = CDbl(x_max)
                    .Axes(xlValue).MinimumScale = CDbl(y_min)
                    .Axes(xlValue).MaximumScale = CDbl(y_max)
                End With
            Next chtobj
        End If

    Else                                            '複数コの場合

        For Each obj2 In obj
            If TypeName(obj2) = "ChartObject" Then
                With obj2.Chart
                    .Axes(xlCategory).MinimumScale = CDbl(x_min)
                    .Axes(xlCategory).MaximumScale = CDbl(x_max)
                    .Axes(xlValue).MinimumScale = CDbl(y_min)
                    .Axes(xlValue).MaximumScale = CDbl(y_max)
                End With
            End If
        Next obj2

    End If

End Sub
ブック内全シートの倍率を一括変更 & A1セルを選択
ダイアログボックスから入力した値に全シートの倍率を変更し,左上A1セルを選択した状態にするマクロ MakeDefault (最終的には一枚目のシートを開いた状態に).
Excelファイルを提出するときにキレイな状態で提出できます.自己満足です.
使用例
先ほどのサンプルブック二枚目に水の密度と温度の関係にシートを追加します(理科年表プレミアム - コンテンツ表示).
いろいろいじってシートの倍率とか選択セルの位置がバラバラになります.


MakeDefault 使うと(デフォルトで倍率は80が入ってます),


キレイになります.以上です.
ショートカットはパーみたいなマークに設定しました.

さらに...
MakeDefaultToFolder で再帰呼び出しを使って指定したフォルダ内のサブフォルダ内までを対象に全.xlsxファイルの全シートに MakeDefault を行います.
フォルダを対象に一気にキレイにしたいときに便利です.
ソースコード
MakeDefault
Sub MakeDefault()


    '** アクティブなブック内の全シートを指定した倍率にしてA1セルを選択し、
    '** 一枚目のシートを表示するサブプロシージャ


    Application.ScreenUpdating = False      '画面の更新を抑制(高速化)
    On Error Resume Next                    'エラーを無視

    Dim zoom As String
    Dim sheet As Object     'ループ中に処理対象となるシートの変数


    Rem シートの倍率を入力
    Call DataInput(zoom, "シートの倍率を入力", 80)
    If zoom = "" Then Exit Sub

    Rem 一番先頭のシートから順にループ処理を行う
    For Each sheet In ActiveWorkbook.Sheets
        sheet.Activate                          '対象のシートをアクティブにする
        ActiveSheet.Range("A1").Select          'シートのA1を選択する
        ActiveWindow.zoom = CInt(zoom)          '拡大倍率を設定する
        ActiveWindow.ScrollColumn = 1           'スクロールを左上に
        ActiveWindow.ScrollRow = 1

    Rem 次のシートを処理対象にする
    Next sheet

    Rem 一番先頭のシートをアクティブにする
    Sheets(1).Select

End Sub
MakeDefaultToFolder
Sub MakeDefaultToFolder()


    '** 指定したフォルダ内(サブフォルダも)のすべてのExcelファイルにマクロ "MakeDefault" をかけるサブプロシージャ


    Application.ScreenUpdating = False      '画面の更新を抑制(高速化)
    On Error Resume Next                    'エラーを無視


    Dim folderPath As String
    Dim zoom As String

    Rem シートの倍率を入力
    Call DataInput(zoom, "シートの倍率を入力", 80)
    If zoom = "" Then Exit Sub

    Rem ダイアログボックスから対象フォルダを選択
    With Application.FileDialog(msoFileDialogFolderPicker)
        .Title = "対象フォルダを選択"
      If .Show = 0 Then
         MsgBox "Canceled."
         Exit Sub
      End If
         folderPath = .SelectedItems(1)
    End With

    Rem 再帰呼び出しマクロのcall
    Call Call_MakeDefaultToFolder(folderPath, zoom)


    MsgBox "Finish!"

End Sub


Sub Call_MakeDefaultToFolder(MyPath As String, MyZoom As String)


    '** 呼び出し用 (再帰呼び出し:RecursiveCall)


    Dim file As String
    Dim sheet As Object
    Dim wb As Workbook
    Dim fso, obj As Object

    file = Dir(MyPath & "\" & "*.xlsx")


    Rem ファイル名が空にならない間繰り返し
    Do While file <> ""

        Set wb = Workbooks.Open(FileName:=MyPath & "\" & file)

        Rem 一番先頭のシートから順にループ処理を行う
        For Each sheet In wb.Sheets
            sheet.Activate                          '対象のシートをアクティブにする
            ActiveSheet.Range("A1").Select          'シートのA1を選択する
            ActiveWindow.zoom = CInt(MyZoom)        '拡大倍率を設定する
            ActiveWindow.ScrollColumn = 1           'スクロールを左上に
            ActiveWindow.ScrollRow = 1
        Next sheet

        Sheets(1).Select    '一番先頭のシートをアクティブにする

        wb.Save             'エクセルファイルを保存して閉じる
        wb.Close

        file = Dir()        '2番目以降のファイル名を取得

    Loop


    Rem FileSystemObjectを使ってフォルダーを取得
    Set fso = CreateObject("Scripting.FileSystemObject")
    For Each obj In fso.GetFolder(MyPath).SubFolders
        Call Call_MakeDefaultToFolder(obj.Path, MyZoom)
    Next


End Sub
※ダイアログボックスで変数の値(Str型)を入力するサブプロシージャ
上のプログラム内で使ったサブプロシージャDataInput.
引数は
X に入力したい変数
message にダイアログボックスのタイトル
message2 にデフォルトで入力する値(空白も可)
です.
色んな所で使えると思います.
Sub DataInput(X As Variant, message As String, message2 As String)

    '** ダイアログボックスで変数の値(Str型)を入力するサブプロシージャ

    Rem        x:変数(文字列型)
    Rem  message:ダイアログボックスのタイトル
    Rem message2:デフォルトの入力文字

    Dim flg_if As Boolean

    flg_if = False
    Do
        X = InputBox(message, default:=message2)
        If StrPtr(X) = 0 Then       ' キャンセル時に終了
            MsgBox "Canceled.", vbExclamation
            Exit Sub
        ElseIf X = "" Then          '値を入力しないでOKボタンを押した場合,再Loopへ
            MsgBox message, vbExclamation
        ElseIf X <> "" Then
            flg_if = True           '入力があった場合おわり
        End If
    Loop Until flg_if = True

End Sub
高速化のため,Application.ScreenUpdating = Falseで画面の更新を制御して,On Error Resume Nextでエラーを無視しています.
おわりに
VBAはネットとか,

できる大事典 Excel VBA 2016/2013/2010/2007 対応 (できる大事典シリーズ)
- 作者:国本温子,緑川吉行,できるシリーズ編集部
- 発売日: 2017/03/17
- メディア: 単行本(ソフトカバー)
皆さんもとっておきの私用マクロありますか?
ライフゲーム(fortran)
Fortranの勉強し始めたとき,遊んだライフゲームを書いてみます.
まずは,
ライフゲームとは
1970年にケンブリッジ大のコンウェイが発明したセルオートマトン.初期条件を与えれば一定の規則で世代が進み,生と死を表すセルが更新されていきます(参照 ライフゲーム - Wikipedia)1.1974年にはTime誌が「ライフゲイムの大群が数百万ドルの貴重なコンピュータ時間を食ってしまっている」と苦言を呈したほど流行ったらしいです2.
代表的なパターン
有名なパターンをいくつか紹介します.白いセルが「生(1)」を,黒いセルが「死(0)」を表しています.個人的にはたった5つの「生」でスタートし,煩雑な模様を展開するR pentominoが面白いです.

例1:Nebula
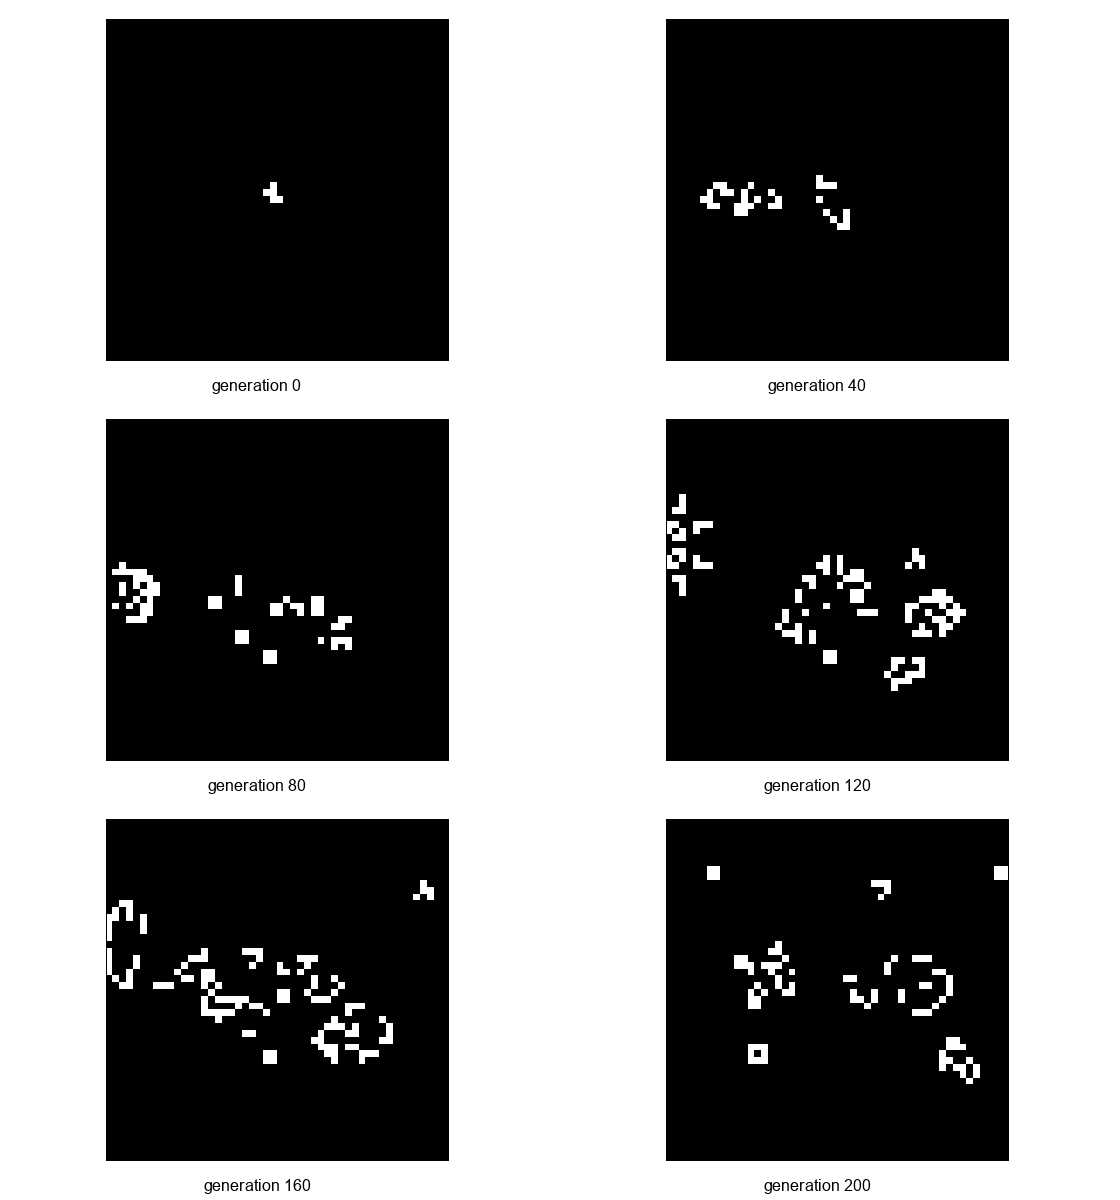
例2:R pentomino

例3:Glider(周期境界条件)
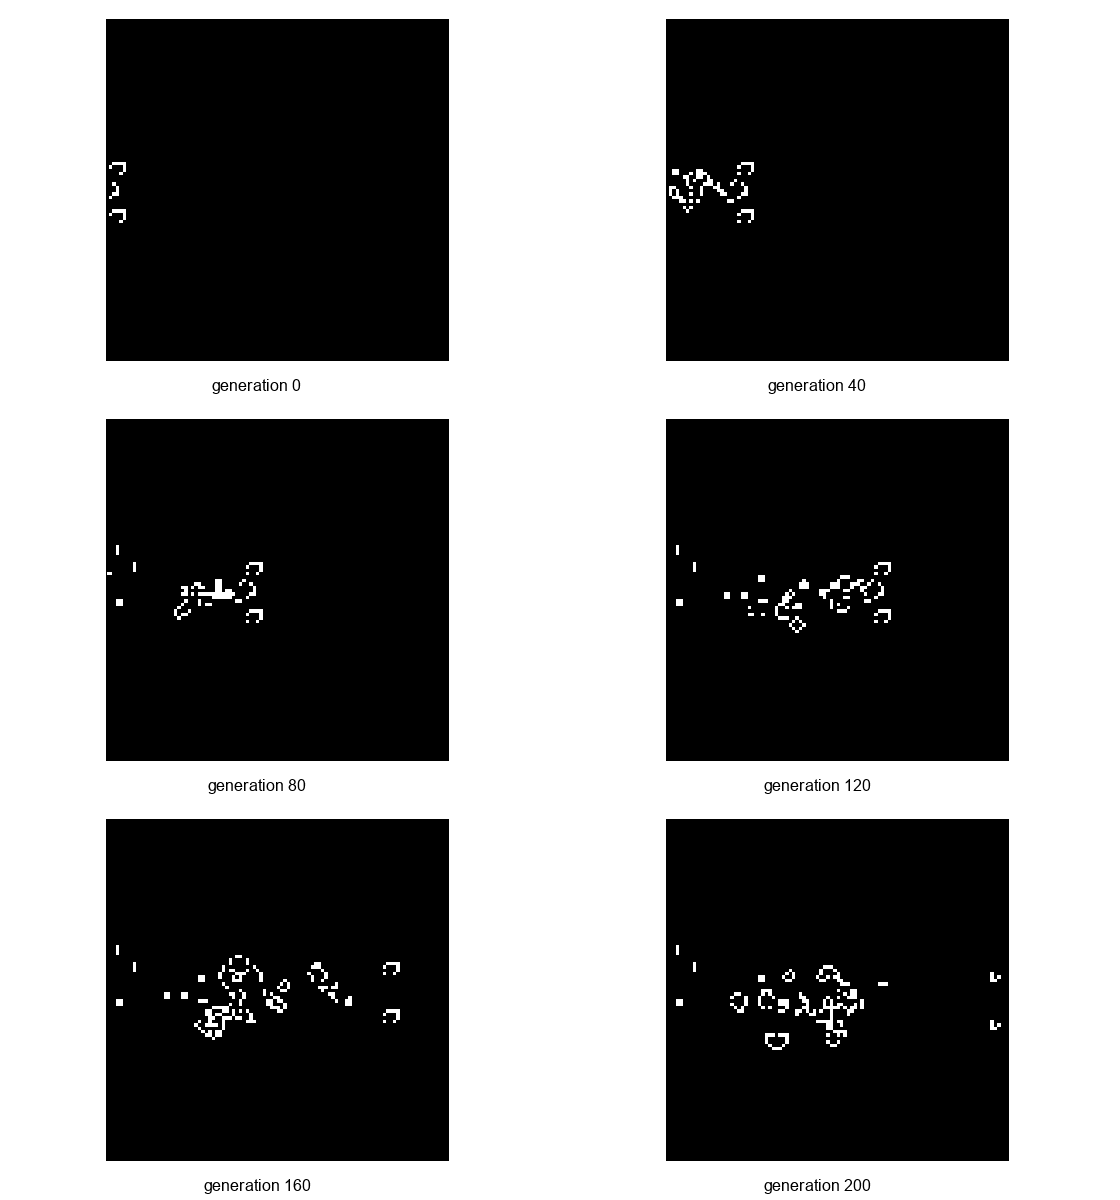
例4:Puffer train
ソースコード
プログラムはQiita記事を参考にさせて頂きました3.
描画領域を正方形にして,初期条件を乱数ではなく,Excelで作成した init_field.txt から読み込ませています.
また,境界の条件はcshiftとeoshiftを使い分けて,固定境界か周期境界かを選べます.Gliderとかは周期境界にしました.
Fortran90/95
! Conway's Game of Life

  module lifegame
      implicit none
      integer :: n
      integer, allocatable :: field( : , :  )
      integer, allocatable :: neighbors( : , :  )
  contains

      subroutine init_field( size )
          integer, intent( in ) :: size
          integer i
          integer ios
          n = size
          allocate( field( n, n ) )
          allocate( neighbors( n, n ) )
          open(10, file="init_field.txt")
          do i=0, n
              read(10, *, iostat=ios) field
              if (ios .lt. 0) exit
          end do
          close(10)
      end subroutine init_field

      subroutine print_field()
          implicit none
          integer :: i
          do i = 1, n
            write (*, '( * ( i0, :, " " ) )' ) field( :, i )
          end do
      end subroutine print_field

      subroutine one_epoch
          implicit none
          integer :: dx, dy, i
          neighbors = 0
          do concurrent ( dx = -1 : 1, dy = -1 : 1 )
            ! 周期境界条件(cshift)
              neighbors = neighbors + cshift( cshift(field, dx, 1), dy, 2 )
            ! 固定境界条件(eoshift, 境界の外は死(0))
            ! neighbors = neighbors + eoshift( eoshift(field, dx, 0, 1), dy, 0, 2 )
          end do
          where( neighbors == 3 )
              field = 1
          elsewhere( neighbors == 4 )
              field = field
          elsewhere
              field = 0
          endwhere
      end subroutine one_epoch

  end module lifegame


  ! MainProgram
  program main
      use lifegame
      implicit none
      integer :: epoch, size
      integer :: i

      write( *, * ) "# size?"
      read( *, * ) size
      write( *, * ) "# epoch?"
      read( *, * ) epoch

      call init_field( size )
      call print_field

      do i = 1, epoch
          call one_epoch
          write (*, *)
          call print_field
      end do

      stop
  end program main
Excelファイルはこんな感じで作成して,テキストファイル(init_field.txt)に出力しました.
以下はGliderの例.

以下,gnuplotでgifアニメを作成します.
gnuplot
reset

set term gif animate size 560, 400    # 出力をgifアニメに設定
set output "field.gif"                # 出力ファイル名

set size square
set nozeroaxis
set notics
unset colorbox

set palette grey                      # gray0 = 黒
set title font "Arial,30"
set key below

do for [n=0:1000:1] {
   plot "field.log" index n matrix with image title sprintf("generation %d", n)
}
おわりに
昨年から上記のライフゲームのプログラムとか
でやんわりとFortranの勉強始めました.参考
ブログのセットアップと記法(CSS, MarkDown)
紆余曲折何とか始められました.
(目次に例に出した"見出し"が入っています)
ブログのカスタマイズ
だいぶ苦労しましたが,人様の解説ブログをいろいろ見ながらなんとかできました(いろいろ漁り過ぎて参考URLわからなくなってしまいました...).
テンプレートはinnocentを使用しています.
GoogleChromeのディベロッパーツール使って,いろんなサイトのhtmlを参考にしながらやるとうまくいくかもしれないです. (そのためにブラウザ変えました.)
ソースコード
/* テンプレート, innocent */
/* <system section="theme" selected="6653586347149180725"> */
@import url("https://blog.hatena.ne.jp/-/theme/6653586347149180725.css");
/* </system> */

/* 目次 */
  .table-of-contents, .entry-content .table-of-contents {
    border: none;
    border-radius: 0 px;
    background: #f5f5f5;
    padding: 20px 20px 20px 50px ;/* 上右下左 */
  }
  /* 大見出しのリストマークを変更 */
  ul.table-of-contents{
      position: relative;
  }
  ul.table-of-contents li {
      list-style-type: none;
  }
  ul.table-of-contents li:before {
      content: "✔";
      position: absolute;
      left: 30px;
      color: #666B6C;
  }
  ul.table-of-contents li ul li:before {
      content: "";
  }
  /*大見出しをボールドに :font-weight:bold; */
  .table-of-contents li{
    font-size: 16px;
  }
  /*中見出しはnormal*/
  .table-of-contents li ul li{
    font-weight:normal;
    font-size: 14px;
  }
  /* 下線なし */
  ul.table-of-contents a{
    text-decoration: none;
  }
  /* 目次周りの余白を調節する */
  .entry-content li ul {
    padding-bottom:5px;
  }

/* パンくずリスト設定 */
  span.breadcrumb-child::before {
    font-size: 20px;
    line-height: 15px;
    color: #3872b8;
  }
  .breadcrumb-inner {
    margin-left: 250px;
    padding-left: 50px;
  }
  /* 記事下のカテゴリー非表示 */
  .entry-categories {
  display:none;
  }


/* 本文フォント */
  #body {
    font-family: TitilliumText22LRegular,ヒラギノ角ゴ Pro W3,Hiragino Kaku Gothic Pro,メイリオ,Meiryo,MS\ Pゴシック,MS PGothic,sans-serif;
    font-size: 14px;
    line-height: 1;
  }
  #title{
    font-weight: normal;
    font-size: 50px;
    text-align: left;
    margin-left: 250px;
    padding-left: 50px ;
    line-height: 2.0;
  }
  #blog-description {
    font-size: 16px;
    text-align: left;
    color: #333;
    margin-left: 250px;
    padding-left: 50px;
  }
  #blog-title-inner {
    margin: 0px;
    padding: 0px;
  }
  /* コードブロック */
  .entry-content code {
    font-size: 90%;
    margin: 0 2px;
    color: #333;
    padding: 0px 5px;
    border-radius: 3px;
    background: #f5f5f5;
    border: 1px solid #dcdcdc;
    }

/* ブログ体裁 */
  #content-inner {
    width: 1000px;
    margin: 0;
    padding: 0;
    border: 0;
    outline: 0;
  }
  #wrapper {
    width: 800px;
    padding: 20px 50px, 50px;
    float: right;
  }
  #main {
    width: 700px;
    float: right;
    margin-left: 0px;
  }
  #box2 {
    float: left;
    width: 200px;
    padding: 25px;
    font-size: 14px;
    border-right:2px solid #eee;
    margin-top: -200px;
  }
  #top-box, #content {
    padding-top: 10px;
    padding-bottom: 10px;
    border-top:0;
  }
  #box2-inner {
    border-left:0;
    padding-left: 0px;
  }
  #main-inner {
    border-right: 0;
  }

/* 見出しフォント */
  .entry-title  {
    font-size: 24px;
    padding: 10px 10px;
    border-bottom: 2px solid #333;
  }
  .entry-content h3 {
    font-size: 20px;
    font-weight: bold;
    padding: 8px 8px;
    color: #fffffd;
    background-color: #285294;
    line-height: 1.5;
    padding-left: 15px;
    position: relative;
  }
  .entry-content h4 {
    font-size: 18px;
    color: #333;
    line-height: 1.5;
    border-left: 6px solid #0091C5;
    padding-left: 10px;
    border-bottom: 1px solid #0091C5;
    position: relative;
  }
  .entry-content h5 {
    font-size: 16px;
    padding-left: 8px;
    position: relative;
    color: #333;
    line-height: 1.5;
  }
  .entry-content h6 {
    font-size: 16px;
    padding-left: 8px;
    position: relative;
    color: #333;
    line-height: 1.5;
    border-bottom:1px dashed #969998;
  }
配色は以下を参考1.
記事の書き方
Markdown記法で書いてみてます2,3.
見たまま&htmlの編集はハードル高そうでしたが,Markdownは簡単で書きやすいです.
見出しはこう書いて,
###見出し3
####見出し4
#####見出し5
######見出し6
こうなります.
見出し3
見出し4
見出し5
見出し6
コードブロックはこう書いて,
`abcde`
こうなります.
abcde
おわりに
次回記事から徐々に書きたいこと書いてみます.
追記,2020年5月2日更新しました.

